

Guess who's back.
Well I guess you can say I'm back, for now at least! It's been two years ('too long' years) since my last post and a lot has been going on and some things have changed, but I'll save that gibberish for another post. One thing that hasn't changed a bit is my love for Korean music. And it only grew. I'm not even kidding. Once you're sucked into it, there is no way out and that's no exaggeration.
ANYWAYS. One of the groups I've completely tripped over, fallen and landed face first for is VIXX. They're nothing short of amazing. Talent is one thing (and they have a hell of a lot of it), but another reason why I adore this group is their unique concepts, which I totally go ga-ga for. The makeup, the outfits, their stage presence, the choreography, the crazy facial expressions, the overall performance..there is nothing better than a visually pleasing presentation to go along with great music. Maybe it's me, but I personally LOVE how they get super in-character and I appreciate that so much. Which brings me here. Thank you VIXX for giving me the inspiration that I desperately needed. Keep going all-out, my 6 colorfully coiffed men.
So along with a cheap can of red Halloween hair paint and excessive face touching, I am back to bring you guys a new makeup tutorial inspired by VIXX's "On and On" MV! Seriously, I still don't quite understand a number of things in this video, but holy crap it's great stuff. Check it out, yo. (Also if you REALLY want to talk conceptual, check out their Hyde MV. You won't regret it...)
This is a live performance where ISH gets real.
"Oh my right eye, it pains me."

I used this photo of main vocal Leo for reference.
I know I'm completely going out of context, but isn't he just the MOST CHARMING THING EVER?!
Ugh. I hate using this word, but...Feels, man.
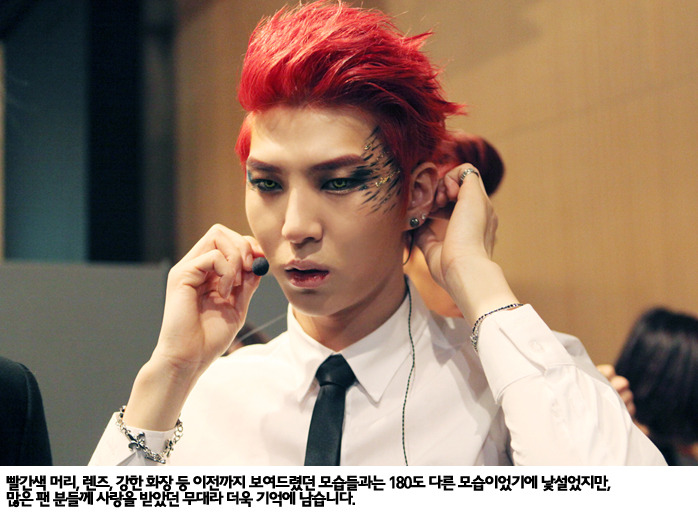
Credit: withvixx.com
Products Used:
- Stila In The Light Palette
- Bright red from the Coastal Scents 88 Palette
- Maybelline Fit Me Foundation in Nude Beige 125
- Maybelline Mineral Power Concealer in Beige 50
- Too Faced Chocolate Soleil Bronzer
- NYX Blush in Raisin (for contouring)
- Urban Decay Primer Potion
- Maybelline EyeStudio Gel Liner in Blackest Black
- Milani Ultrafine Liquid Liner in Black Vinyl
- Milani Eye Tech Extreme in Blackest Black (for waterlines)
- NYX Glitter Cream Palette in One Night in Luxy
- Maybelline Falsies Mascara
- Daiso lashes
- NYX Soft Matte Lip Cream in Amsterdam
Let's get this thang rollin', shall we?
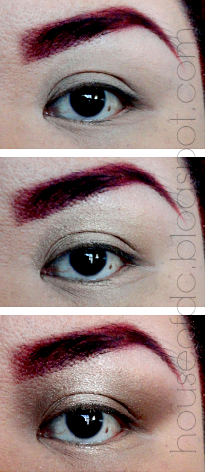
1. Prep your face (primer, foundation, etc). Apply contouring powder to define the frame of your face including the hollows of your cheeks, the bridge of your nose, jawline and your temples. Optional: Fill-in brows with a red shadow (I chose to do Leo's since he had the most recognizable makeup during promos) and apply eyeshadow primer all over lid.
2. Using Stila's In The Light Palette, I applied the shimmery light gold e/s Bubbly right on the lid slightly passing the crease and across the bottom lash line.
 3. Next I applied a combo of Sunset, Gilded Gold and Luster on my outer and inner corners of my eyes, fading it upwards and focusing more on making it a gradient by adding a bit more Luster for more depth and drama.
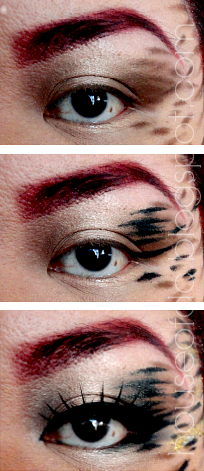
4. Using an angled brush, use a flick motion with light pressure and apply a brown e/s (Sandstorm) to where you want your details to be. I used the highest part of my crease as a guide to where I would start. *If you don't have a crease, use the highest part of your upper lash line as a guide and go from there. Now apply flicks from your temple, slightly passing down to where your cheekbones begin.
5. Now using the same flick motion, carefully trace over the brown lines with a black gel liner using a thin brush or an angled eyeliner brush. You can leave a few of the shorter brown lines untouched if you'd like.
6. Apply eyeliner as you normally would and thicken towards the outer-v and wing it connecting to the bottom lash line. Add a bit of point to your inner corner and apply a coat of mascara and some falsies (optional).


To get the look of VIXX's washed out "just bitten my last victim/i'm a vampy rawr" lips, apply a bit of foundation on the edges of your lips, blending it inward not filling all the way in.
- Next, take a red lip tint or red lip stain and apply it on the inner part of your lips and add streaks to where your lips have their natural creases.
- Using a small brush, take a black or dark grey e/s, wipe off the excess powder and lightly apply it in random cracks/creases for that awesomely yucky dried-up blood effect. And you're done!
If you're not a chicken like me, put on some yellow/gold contact lenses for the ultimate monster look the boys had in their MV. Otherwise, stick to photo-editing them in like I did. Haha. You can also spray your hair with some temporary hair spray/paint. Got mine at the Halloween secion for less than $3.
It's been a while since I've done concept makeup and I've forgotten just how fun it is. It's so refreshing~
Hope you guys liked this tutorial! Made it just in time for Halloween! Have fun with this!

-DC
*PLEASE DO NOT redistribute my photos or take them out of my blog without permission.
If you would like to share, please link directly to this post. Thanks!♥
Wow this is so cool!~ I'm really glad I found your blog. I am subscribed to your brother on youtube and on his description box I saw your link so I clicked it~ I really suck at make-up creativity but I really like how easy you made all the steps :3 and yes! Vixx is so awesome ♥‿♥
ReplyDeleteThank you so much! I'm really stoked that you like it!♥
Delete